Description: The process below explains how to transfer the tag list from an old/existing IDVisor Smart V1/V2/Plus to a new IDVisor Smart device. This is useful if adding a new IDVisor Smart device for additional use or purchasing a new IDVisor Smart device to replace an existing one.
On the Existing Scanner:

Step 1: On the Home screen tap on Setup.

Step 2: Tap on Tag List.

Enter your pin code when prompted.
NOTE: If you do not know your pin code, refer to the User Manual or contact us using a company email/phone number to reset the pin.

Step 3: Tap on Export Tagged Cutomers to export the tag list.

Tap No if you will connect the device to your PC to access the file.
Tap Yes only if you wish to send the file remotely using Gmail or Google Drive.
After doing so, reboot the device.

Step 4: Connect your scanner to your PC.
If using a Smart V2 or Smart Plus set your device to File Transfer mode. See here on how to set device to File Transfer mode.
Once connected in File Explorer go to PDA > Internal Shared Storage > Documents > IDVisor Smart.
Locate the exported Tag List. It will be named BannedVIP_(Serial number of device)_(date of export in YYYYMMDD format).csv. I.E. BannedVIP_951621092410_20220421.csv.
Copy the file to your desktop and rename it Banned_VIP.
On the New Scanner:

Step 5: Connect the new scanner to your PC.
If using a Smart V2 or Smart Plus set your device to File Transfer mode. See here on how to set device to File Transfer mode.
Navigate to PDA > Internal Shared Storage > Documents > IDVisor Smart.
Copy the Banned_VIP.csv file onto the new scanner.
After doing so, reboot the device.

Step 6: On the Home screen tap on Setup.
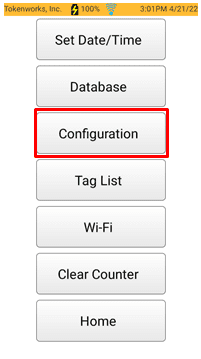
Step 7: Tap Configuration.

Step 8: Tap Advanced.

Step 9: Tap on Import Tags. Then select Import.

After importing you should see a notification at the bottom of the screen letting you know the tags imported successfully and the number of tags that were imported.

Tap on View Imports to ensure the tags were imported.
You have now successfully transferred your tag list to the new device.