Description: If you have list of customers that you would like to ban, make VIP, etc. You can upload a tag list on to your IDVisor Smart/Smart Plus. You can also upload existing tag lists from previous generation scanners if you have upgraded to a IDVisor Smart/Smart Plus.
Instructions: Follow the directions provided to upload a tag list to your IDVisor Smart/IDVisor Smart Plus.
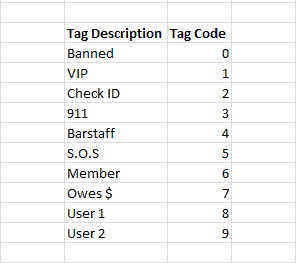
1. Create Tag List in Microsoft Excel. The column format should be as followed: Last Name, First Name, ID Number, Date of Birth (MMDDYYYY), Tag Code (for default Tag Code List see here).
Name the tag list Banned_VIP.csv and save in a csv format. For help on saving a file in csv format see here.

Tag list should NOT include column headers. All fields are not necessary except Last Name, First Name, and Tag Code. Please be aware the more fields completed will provide more accurate results.
2. After creating your Tag List you will need to save it as a csv file (see steps on how to save an excel file in a different format here). After saving as a csv file you will now need to put the file on the device. Please start by restarting the device then connecting it to a PC using a micro usb cable.

Once connected the device will appear in File Explorer as an U8000 or U9000 (Smart Plus) device. The contents of the device will be in Phone Storage.
3. Open Phone Storage. You will now see different folders which are on the device. Open the folder called Documents.

4. In the Documents Folder you will see 2 additional folders called IDVisor Smart and IDVisor Smart Pics. Open the folder named IDVisor Smart.

5. Copy and paste the Banned_VIP.csv file in the IDVisor Smart folder. Once complete you may disconnect the device from the PC.

6. After disconnecting the device from the PC, we will now import the tag list into the IDVisor Smart App. From the main menu of the IDVisor Smart app go to Setup -> Configuration -> Advanced.
7. In Advanced you will see an option for Import Tags.
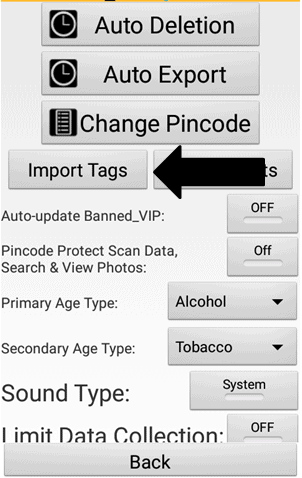
8. Select Import Tags. You will then see a pop up message appear with details on importing a tag list. Select the Import option to complete the import of the tag list. When complete you will received a message stating Import Complete. If you receive any error message after selecting Import please review steps 1-5 and try again.

If after attempting these steps you are still unable to import a tag list on your device please create a support ticket leaving your Name, Business name, Phone, and email address here.