Location Checking on AgeVisor and AgeVisor Touch
What is Location Checking?
Location Checking allows you to import whitelisted locations allowed at your business. They can include any combination of Address, City, State, or Zipcode. After a customer’s ID is scanned, an icon will be displayed indicating whether their location is on the list. If their location is on the imported list, the icon will display “Good Location”. If a customer’s ID is scanner and their location is not on the imported list, the icon will display “Bad Location”.
 Example of customer with whitelisted location being scanned.
 Example of non-whitelisted location being scanned.
Creating your Location list
Before enabling location checking, you will first have to create the Location list you wish to import. The list will have to be created and saved as a csv file in order to be uploaded into the AgeVisor application. We recommend using Microsoft Excel or Google Sheets to create your list.
See the links below on how to convert a spreadsheet into csv format:
Source: support.microsoft.com
How to convert spreadsheet to csv in Excel
Source: organimi.com
How to convert spreadsheet to csv in Google Sheets
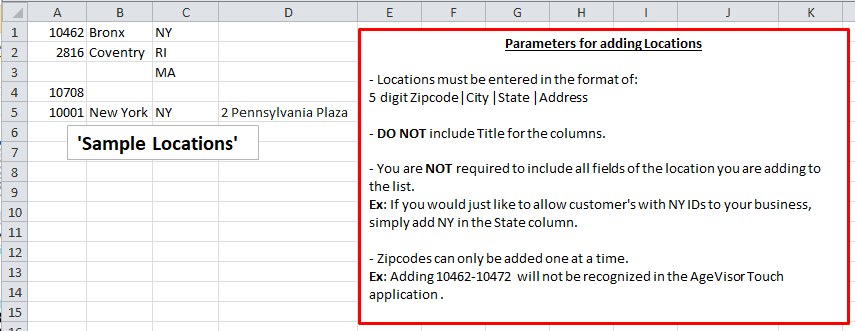
Locations must be entered in the format of: 5 digit Zip Code, City, State, Address
DO NOT include the Title for the columns
You are NOT required to include all fields of the location you are adding to the list
Ex: If you would just like to allow customer’s with NY IDs to your business, simply add NY in the State column.
Zip Codes can only be added one at a time.
Ex: Adding 10462-10472 will not be recognized in the AgeVisor Touch application.
Importing your Location List
We will now import the created Location list in to the AgeVisor Touch/AgeVisor POS software.
NOTE: If importing to an AgeVisor Touch, place the file on a USB drive and connect the USB to your AgeVisor Touch unit. The USB ports are located on the right side of the AgeVisor Touch.
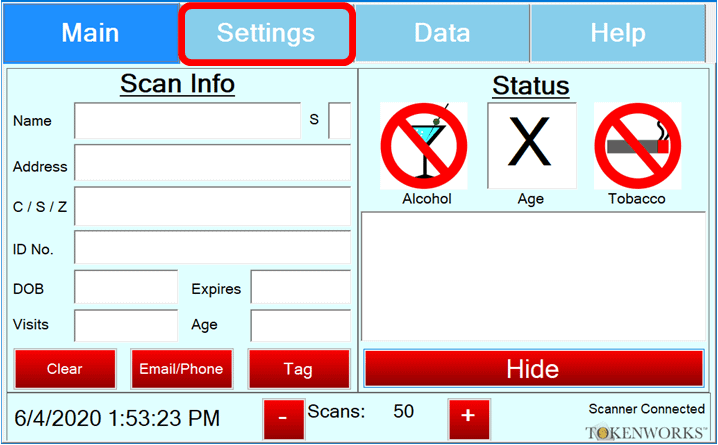 Step 1: From the Main screen, navigate to Settings.
 Step 2: On the Settings screen, select Scanning Preferences.

NOTE: Your passphrase will be required to access the Scanning Preferences. Please refer to your manual for the default passphrase if it has not been changed.
 Step 3: Once in Scanning Preferences, select Advanced Settings.
 Step 4: In the Advanced Settings window, check the box next to Location Checking in order to enable the feature.

Step 5: After enabling Location Checking, select Edit Locations.
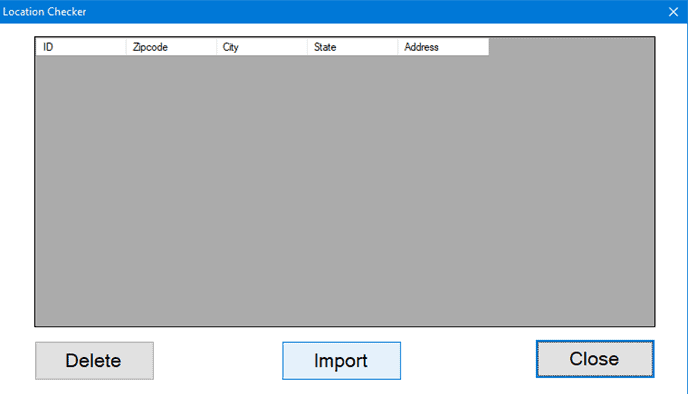 Step 6: After selecting Edit Locations, you will now be taken to the screen where you can import your location list. Select Import to begin the process.
 After selecting Import, you will see a pop up window with a message letting you know how the csv file should be uploaded. Select OK after reviewing this message.
 Step 7: After selecting OK, you will navigate to the location where the created .csv location file is saved. Select the location list then select Open.

After Open has been selected, you will be taken back to the Location Checker window. There you should see all the locations from the list you uploaded.
After confirming your whitelisted locations were added select Close and navigate back to the Main screen.
As shown above, when a whitelisted location is scanned the “Good Location” symbol will show.
When a non-whitelisted location is scanned the “Bad Location” symbol will show.
If you have any issues or need any assistance with creating and adding a location list to your AgeVisor Touch/AgeVisor POS software please open a support ticket here.