Deleting Data on an AgeVisor Touch
If your AgeVisor Touch is approaching full storage, you will need to clear data off of the device. This is important to keep the device performing at a high level.
We recommend exporting the current data on the device before deleting the data off the device. Please see here on how to export data before deleting it off the device.
Follow the directions below in order to delete data off of your AgeVisor Touch.

Step 1: Select the Data tab on the top of the AgeVisor Touch software.
While on the Data window, select Database.
Note: You will need the pincode to access the Database options. The Default Pincode of the device is located in the User Manual & Quickstart Guide which came with your unit. If you have forgotten your changed Pincode please open a support ticket here for Pincode reset instructions.

Step 2: After accessing the Database options, we will now Unlock the DB Delete Features.
Select Unlock and enter the pincode to unlock the DB Delete Features.

You can delete the data on the device by deleting the Scans, Customers, and/or Tagged Customers. The data for each option can also be deleted from a certain time range as shown below.
Delete Scans: Deletes Scan data off device Ex: Deletes scans that were done in real time
Delete Customers: Deletes Customer data off device Ex: Deletes customers that has been scanned on the device
Delete Tagged Customers: Deletes tagged customers on the device Ex: Deletes customers that has been made Banned, VIP, etc
Enter the age of Scans and/or Customers you would like to delete off of your device then select Delete.
I.E – Entering 365 will delete any Scans/and or Customers older than 365 days.
NOTE: To clear all scans and customers ensure “Delete Scans”, “Delete Customers”, and “Delete Tagged Customers” options are checked. The days to delete must be set to 0.

Step 3: Select the options you would like to delete under One time deletion.
After selecting your options, type in the days of data you would like to keep on your device.
After confirming the selections you made, select Delete.

After selecting Delete, you will receive a message notifying you with the amount of records that were deleted.
After receiving this message select OK, and then Close to return to the Main screen.
Enabling Auto Deletion
If you are required by your state and/or would like to make sure customer scans are cleared from the device daily, you can enable the Auto Deletion feature on your AgeVisor Touch.
This will eliminate the process of having to manually delete the scans daily, also it will ensure the scans are deleted allowing you to comply with any state laws when it comes to scanning IDs.
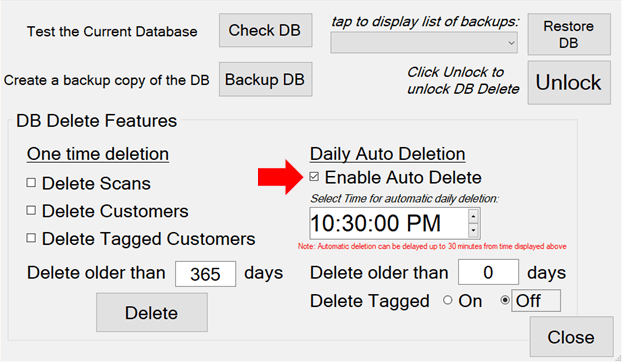
To enable Auto Deletion, select the check box next to Enable Auto Delete.
NOTE: Auto Deletion will delete Scans and Customers by default.
After enabling Auto Delete, type in the days of data you would like to keep on your device.
Select if you would like to keep Tagged Customers by selecting On or Off next to Delete Tagged.
After making your selections, select Close.
Restart the application for the changes to take effect. You can do so by going to Help > Exit app, then clicking the AgeVisor Touch icon (martini glass) to reopen the software.
If after attempting these steps you are still unable to resolve your issue please create a support ticket leaving your Name, Business name, Phone, and email address here.