If your AgeVisor Touch does not power up or is having any power issues please try these troubleshooting steps to address the issue:
This issue is most commonly caused when power to the unit is abruptly stopped. Examples of this are pulling the power cord from unit before a proper shutdown or a power outage occurring shutting power off from the unit.

How to properly power off AgeVisor Touch:
- Hold the power button down for 2-3 seconds, then slide down the screen when prompted.
- Wait till Red LED completely shuts off before unplugging power cord from the left side of the unit.
Note: Before beginning the troubleshooting steps please determine if your AgeVisor Touch is using a 12V or 5V power supply by viewing the images below.

12V DC 2.4 Amp 5.5mm x 2.5mm Center Positive Plug

5V DC 3 Amp 3.5mm x 1.35mm Plug Center Positive
1. Make sure the power cord is completely inserted into the power jack located on the left side of the unit. The power jacks will be different depending on if you have a 12V or 5V model of the AgeVisor Touch (see above pictures to determine if AgeVisor Touch is 12V or 5V model).

5V AgeVisor Touch model.

NOTE: Starting in January 2019, the 5V AgeVisor Touch model power supply is now screwed in to the side of the unit using a cable clamp to prevent any loose connection.

12V AgeVisor Touch model.
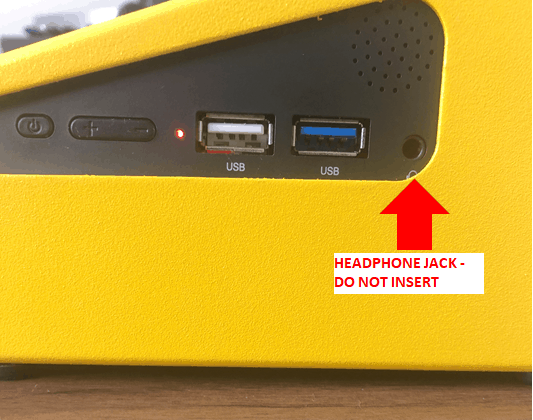
NOTE: Do not confuse the headphone jack with the power jack. The headphone jack is located on the right side of the unit next to the USB ports. Plugging the power supply into the headphone jack will NOT provide any power to the unit.
2. Ensure the correct power supply for your version of the AgeVisor Touch model is being used (see pictures below to confirm correct power supply is being used. When confirmed, try plugging the AgeVisor Touch power supply into a different wall outlet.
If you have lost or damaged you AgeVisor Touch see here for replacement power supplies we’ve ordered and tested from Amazon.

12V DC 2.4 Amp 5.5mm x 2.5mm Center Positive Plug

5V DC 3 Amp 3.5mm x 1.35mm Plug Center Positive
3. Check to see if any damage has happened to the power cord such as any small tears or fraying of the cable.
4. Power cycle the AgeVisor Touch. Follows the steps below to power cycle your AgeVisor Touch. These steps will work for the 12V and 5V models of the AgeVisor Touch.
5V AgeVisor Touch model used to demonstrate steps below.

Step 1: Unplug the power cord from the power jack. Leave the unit unplugged for 15 seconds.
NOTE: Starting in January 2019, the 5V AgeVisor Touch model power supply is now screwed in to the side of the unit using a cable clamp to prevent any loose connection. Skip Step 1 if your power supply is connected to the power jack in the same way shown in the picture to your left.
Step 2: After 15 seconds of leaving the unit unplugged, re-insert the power cord.
Step 3: After plugging the power cord back in, hold the power button down for 30 seconds. If the AgeVisor Touch does not power up immediately, let go of the power button and hold it down for an additional 30 seconds. The Red LED on the side of the unit should light up when the unit is powered on successfully and the AgeVisor Touch will begin to boot up.
After 2-3 minutes the AgeVisor Touch should boot up to the Main screen of the software.
If the Red LED light turns on but the AgeVisor Touch boots to a black screen please scroll to the bottom of the page and open a support ticket to request a RMA.