This post will take you from the initial setup of your local Mac OS X development environment to getting your ID scanner (IDWedgeKB) working in serial port mode with a web form, and everything in between. Ultimately, it will provide all the instructions required to demonstrate the IDWedgeKB in serial port mode sending data to the browser, using Node.js and Express to host a server written in JavaScript.
NOTE: If you are looking for the Windows OS version of this post, please see this post.
Please watch this video to see the related Windows demo to get a solid idea of what the entire process entails, but read on to learn the key differences with Mac OS X:
NOTE: If you need help in connecting and configuring your IDWedgeKB, for general serial port mode usage, please first see the guide found here as this current document serves to explain how to work with your device in conjunction with Node.js and, additionally, a web form and therefore assumes that you have already configured your device properly.
Initial Setup and Required Resources —
You will need:
- An IDWedgeKB
- A Macbook computer running Firefox, Chrome, or IE
- A Driver’s License with a 2D barcode
- The SerialServer test app (listed below) – a folder with the JavaScript file/application and corresponding html page with form to be filled
- The document – IDWedgeKB Serial Port and NodeJS
Download the Resources:
This documents all the steps in the video above:
IDWedgeKB-Serial-Port-and-NodeJS.pdf
The inf files to install the IDWedgeKB, unzip this to a folder on your PC, you will need this during h/w installation.
The SerialServer test app, unzip this to a folder on your PC to a folder you will navigate to with the command prompt.
Initial IDWedgeKB Configuration —
If you have a PC with a Windows OS available to you then please follow the above linked-to PDF guide, in conjunction with the requisite inf files folder above to first configure your IDWedgeKB — before proceeding to the Node.js portion of this guide — the video above will also walk you through the IDWedgeKB configuration.
If you would like to configure the IDWedgeKB via Mac OS X that you are currently working on and ultimately looking to work on (hence your reading this guide) then you will need to install a Windows Virtual Machine as the necessary files are only accessible via flash-drive mode. Our guide on how to accomplish this can be found here.
Confirm your IDWedgeKB config file is similar to this image before continuing.

NOTE: Please only proceed AFTER having completed the above steps because although you will be able to complete a number of the below steps — once you actually start trying to test and work with your device via the provided web form/server — your device will almost undoubtedly not be configured properly to do so and issues will therefore arise.
Ensure that you close the Windows Virtual Machine once your IDWedgeKB is configured. Once closed, reconnect your IDWedgeKB. Failure to do so will cause issues later on this setup with your IDWedgeKB not being recognized.
Setting up your local development environment for Node.js and NPM (Node Package Manager) —
The IDWedgeKB is a barcode scanner that reads and parses the information encoded on the 2D barcode found on U.S. Driver’s Licenses. IDWedgeKB has two modes of operation; Keyboard and Serial Port. This document describes how to use IDWedgeKB in Serial Port mode, run the provided Node.js SerialServer.js application, and send barcode data to the browser running the SerialPage.html page and corresponding web form.
Node.js is a cross-platform open source JavaScript run-time environment built on Google’s Chrome’s V8 JavaScript engine. Node.js lets you code server-side applications in JavaScript and run that on a server.
There are two main (and recommended) ways of downloading/installing Node.js
- Download the latest LTS(Long Term Support) Version: 12.13.0 (includes npm 6.12.0)the via the official Node.js website: https://nodejs.org/en/download/.

Node.Js download page, MacOS Installer(.pkg) selected Once you’ve downloaded Node.js, run the installer, and you need not make any changes and just hit ‘Next’ on all the steps. The Node.js setup comes built-in with the Node Package Manager which is required to download and install third party modules/packages. You will find yourself using NPM very often. So, do not change this setting while installing Node.js on your computer. Also, the setup automatically modifies the PATH variables so that you can run npm commands from the Terminal.
- Install via terminal with curl or homebrew (from the website — “the missing package manager for macOS (or Linux)”):
-
curl "https://nodejs.org/dist/latest/node-${VERSION:-$(wget -qO- https://nodejs.org/dist/latest/ | sed -nE 's|.*>node-(.*)\.pkg</a>.*|\1|p')}.pkg" > "$HOME/Downloads/node-latest.pkg" && sudo installer -store -pkg "$HOME/Downloads/node-latest.pkg" -target "/" -
/usr/bin/ruby -e "$(curl -fsSL https://raw.githubusercontent.com/Homebrew/install/master/install)"brew install node
-
NOTE: Only use ONE of these methods to install Node.js. Having multiple downloads of Node.js may cause issues.
Further Reading:
Installing Node.js packages needed to work with serial port device data and web applications —
After installing both Node.js and NPM via one of the above means, it is now time to install the following packages to actually communicate with the IDWedgeKB and run the serial server —
NOTE: If you had Node.js and NPM installed prior to using this guide then it is recommended to run the npm list “package-name” for the specific packages named above. Otherwise it will likely be difficult to discern and verify proper installation due to the potential that you have a number of packages installed and the way they will be displayed is in a hierarchical, nested fashion.
Node packages:
- Command-line tools —
- serialport — About / Installation Guide
- @serialport/list — https://www.npmjs.com/package/@serialport/list
- Server / Serialport device / Web Form data reading and communication —
- express
- http
- socket.io
The first module to install is the serial port, and we recommend you install this, and its corresponding packages, globally (-g) so you can use them as command line tools. There are some handy serial port commands you might be interested in as a developer, like: serialport-list.
To install the above packages run the following command for each of the above (5) listed packages:
npm install serialport -g- This package provides everything you need to start talking over your serialport. It provides a high level Stream Interface, auto detecting bindings, and a set of parser streams.

npm install @serialport/list -g- NOTE: These cli tools (list, repl, terminal) were formerly part of the
serialportpackage and have now been moved to their own packages for ease of use.
- NOTE: These cli tools (list, repl, terminal) were formerly part of the

NOTE: If you encounter an issue with permissions/access while installing these packages you will have to enter the following commands:
- sudo chown -R $USER ~/.npm
- This command will ask for your device’s password.
- sudo chown -R $USER /usr/lib/node_modules
- NOTE: This command may take up to 5 minutes to complete.
- You will no longer have to put your password.
- sudo chown -R $USER /usr/local/lib/node_modules
These commands will give you the access required to continue your setup.
npm install express -g
npm install http -g
npm install socket.io -g
NOTE: If permission/access issues continue to exist, execute the previous commands beginning with “sudo”.
Example Commands:
sudo npm install express -g
sudo npm install http -g
sudo npm install socket.io -g
Finally, you are ready to test out your device via the aforementioned and downloadable (hopefully already downloaded, but if not — download the SerialServer.zip folder here or above).
Running the Serial Server test app with Node
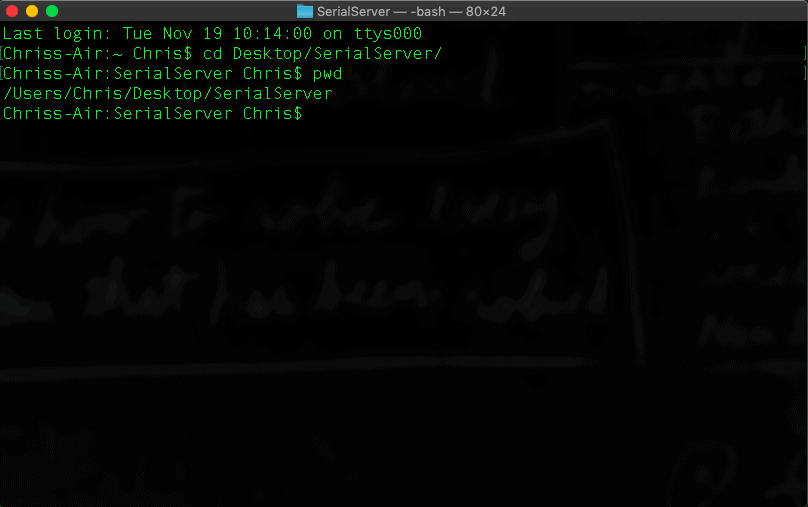
For this step you will be in the directory where the folder SerialServer is located.
— Make note of the destination folder once you have downloaded the SerialServer.zip file and extracted the contents; it is recommended that you move the folder to wherever is easiest to minimize navigating via Terminal.
Once again run the serialport-list command to see something similar to the following:
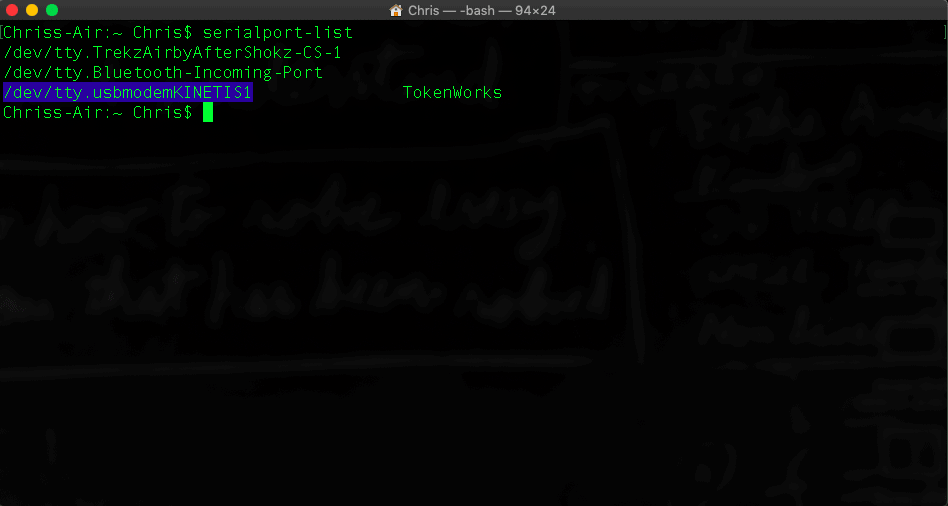
Make note of which device you are trying to communicate with and then it is time to run the application — in this case we are using: /dev/tty/usbmodemKINETIS1
To run the app, you must navigate to the directory where you have it saved, via the cd command and then use the pwd command to confirm, like so:
The SerialPage.html file is served to the browser from the sub-folder called public when the browser attempts to load a page at this address: http://localhost:8080/
Run the following command as shown below to start the server and serve the web page —
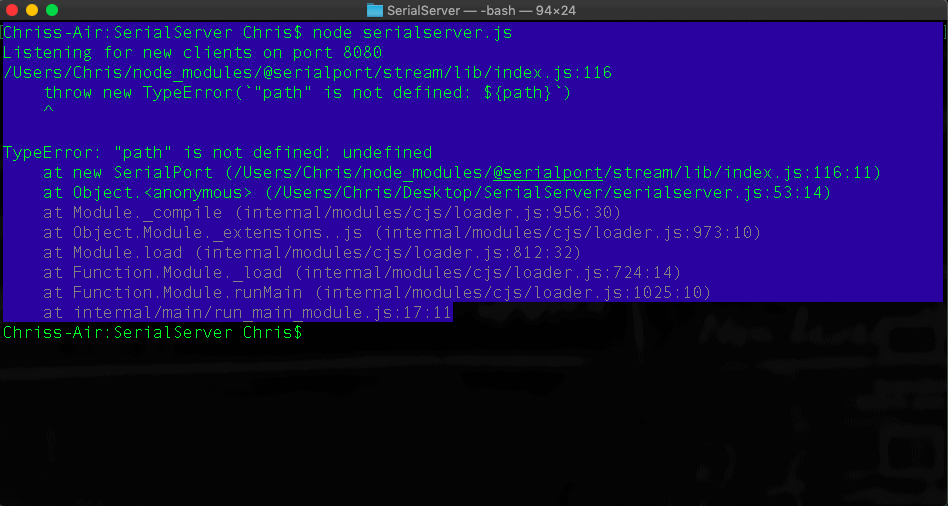
However, if you do provide a device — when you press Enter — If it is not properly connected the app will exit.
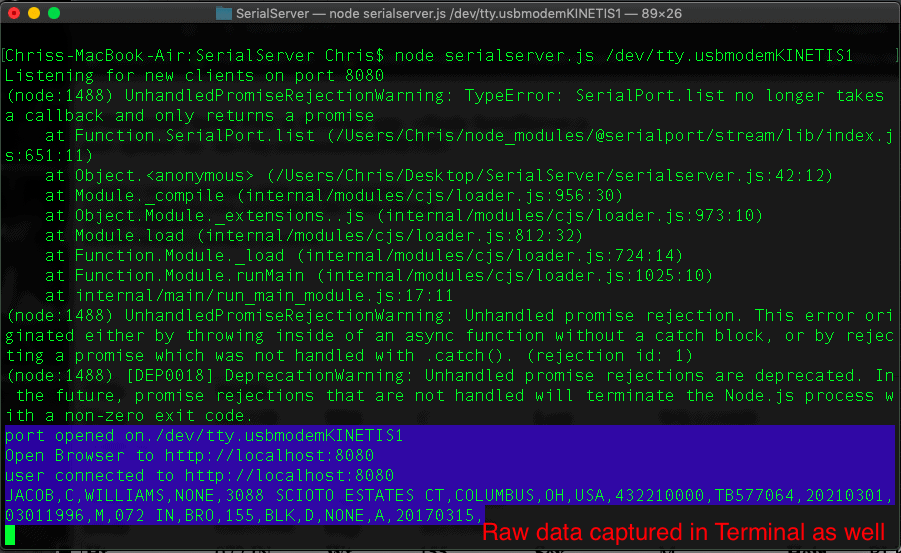
Barring the above — If you run the command correctly as with this example — node serialserver.js /dev/tty.usbmodemKINETIS1 — this is what you should see:
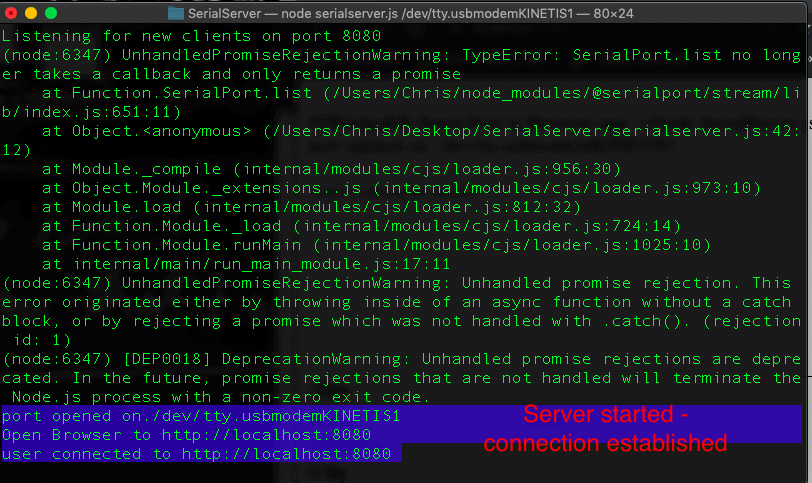
The Unhandled Promise Rejection Warning in the above screenshot will be addressed in a future update to this guide as the current approach in the code will be deprecated.
Again (as stated in the above caption) — the code and app work as constituted — a FUTURE UPDATE is forthcoming to address the above exception/warning.
Open a web browser to local host at port 8080: http://localhost:8080 and this is the basic form you will be presented with —
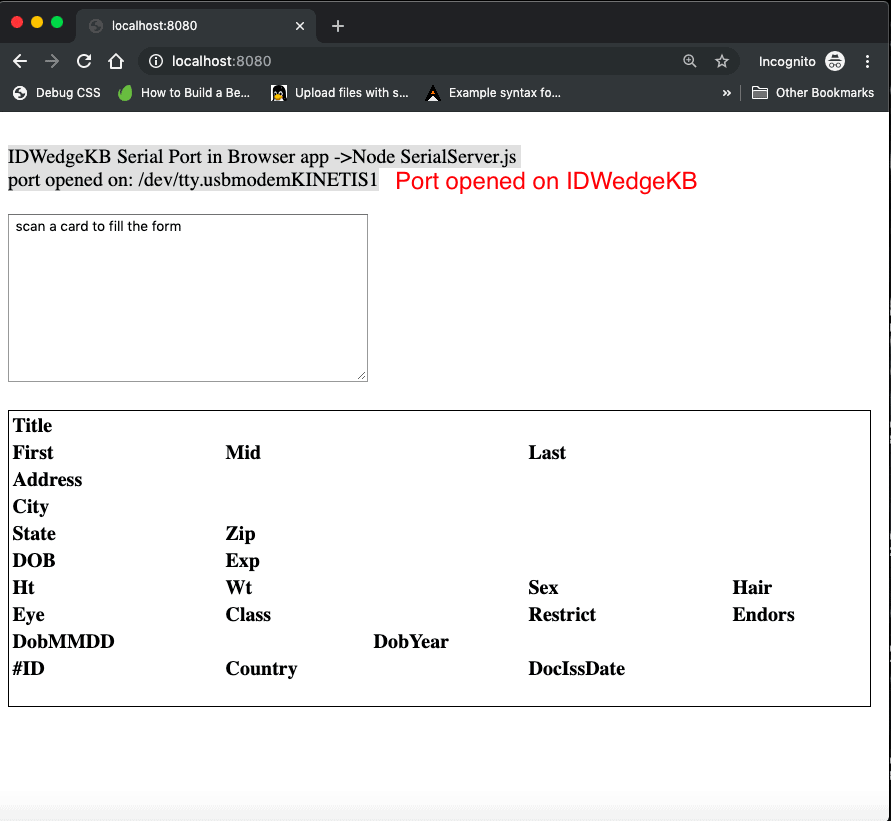
You should see, at the top-left of the page, that a port has been opened and a successful connection made with the device you specified.
Try scanning a card (no need to insert the cursor into the text area that says “scan a card to fill a form”) the result of which should appear as below —
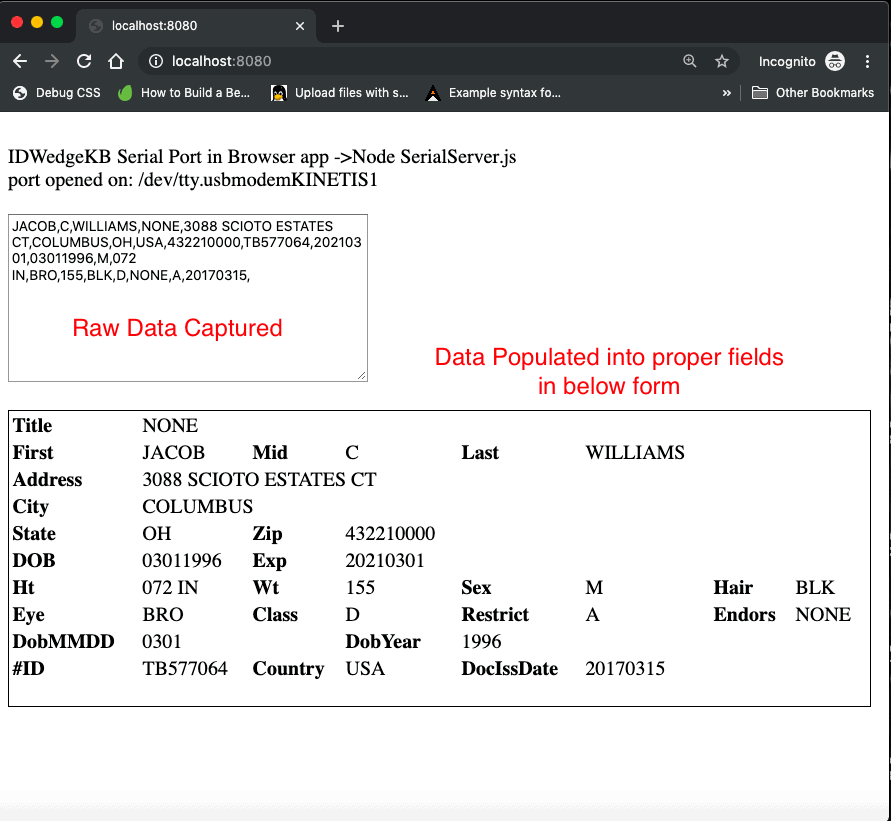
You can observe the CSV string printed in the text box above, the JavaScript in the browser parses the CSV string and assigns the table below the text box with field information.
The Terminal also displays the CSV data sent by the IDWedgeKB (as seen in the below screenshot) —
To end the demo, simply enter Ctrl+c in the command prompt.