UPDATE:
Now supporting Internet Explorer Version 11 — in addition to the previously and still supported latest versions of: Microsoft Edge, Mozilla FireFox, and Google Chrome
Normally, almost any web page will work with IDWedgeKB, but, it would require that the cursor be located on the first field to be filled. The IDWedgeKB demo page uses Javascript to capture the keystroke data, without requiring the cursor to be on any field. This approach allows for fast and accurate form fills, with no requirement for mouse or cursor placement by the end user.
This post will provide instructions required to demonstrate the IDWedgeKB in Keyboard mode sending data to the browser, without requiring the cursor to be focused on any field.
But first — to see the form in action (on a range of platforms/devices) — please see the video below:
The IDWedgeKB demo page is available at the following URLs:
http://idwedgekb.azurewebsites.net/
or
https://idwedgekb.azurewebsites.net (Secured)
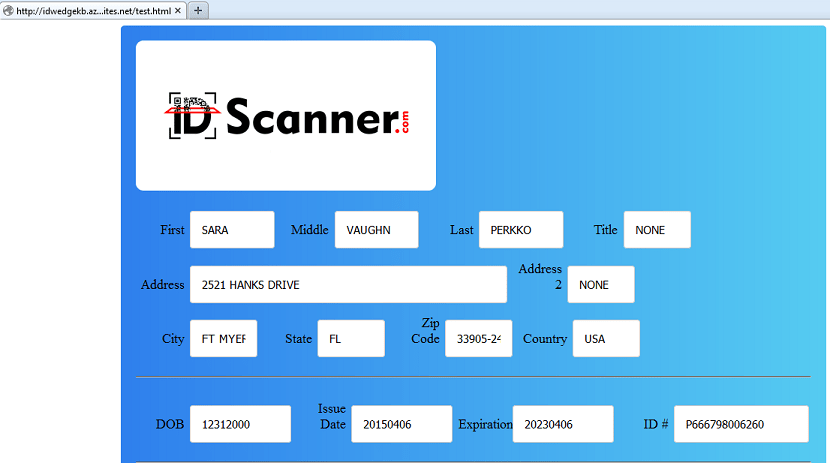
Below is a screen shots of the demo page, filled with test data:
To use this web page with your IDWedgeKB, you will need to update the devices flash memory with the appropriate formula.
We have provided a download link for the file: DriversLicense.txt
Simply click on the link above to download this file, and then follow this procedure below:
Step1: Update the formula file
Disconnect IDWedgeKB scanner from the PC
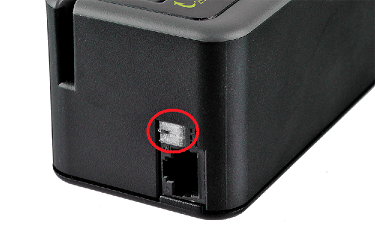
Locate the Memory Access button on the side of the unit, press and hold this button, while plugging the scanner into the USB port of your PC.
You will see a new drive on your PC, open up an Explorer window and navigate to the new drive called IDWedgeKB(F):
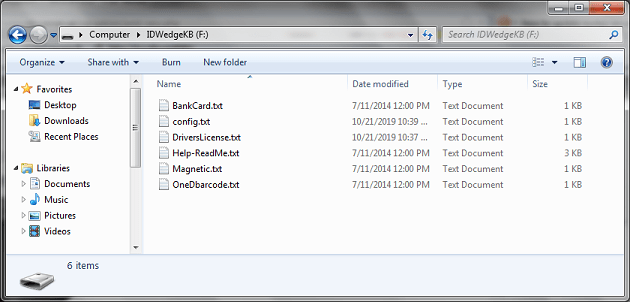
Note: your drive letter may be different, in this case it is drive (F):
Now copy the new version of DriversLicense.txt to new drive called: IDWedgeKB on your PC and replace the existing file. You may want to backup your current version of DriversLicense.txt to preserve any formula you may already have.
Step2: Verify configuration
To ensure that your config.txt will have the correct settings, open the file config.txt with the Notepad app or other simple text editor (Do not use Word or other word processor)
below is an example of the suggested settings.
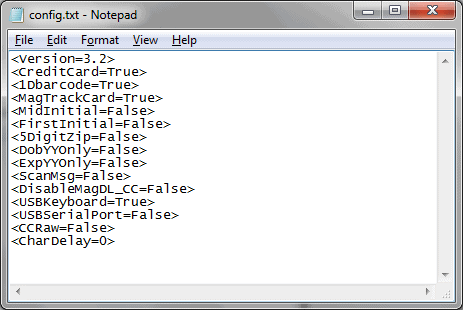
Note: the primary setting to ensure the demo page will work is:
<USBKeyboard=True>
<USBSerialPort=False>
If you make any mistakes editing any files, and you can not get the device to work, you can simply erase all the files, and IDWedgeKB will restore them to default values.
Step4:
With a browser open to the test page, scan a card. The data will be read by the JavaScript and the fields will be populated, there is no need to use a cursor in this demonstration.
The submit button does nothing at this point, and the Reset Form button will clear out the data and ready the page for the next scan. If you scan other cards, like bank cards or loyalty cards, the form may display partial data, and then you would need to click the Reset Form button to restore proper behavior.
End of Demo.
To find the latest firmware and users manual for IDWedgeKB, use this link:
https://www.idscanner.us/idwedge-kb/idwedgekb-firmware-update-3-2/