As you may know (hence why you may have arrived on this page) accomplishing the above is not as straightforward as it is on a Windows computer, for instance; it’s certainly not as “plug and play”, so to speak. Below is a helpful guide/summary of the steps that need to be taken in order to get going with this task, and a list of resources for both initial understanding and further reading.
NOTE: While the IDWedgeKB is compatible with Mac OS X as a barcode scanner, its flash drive mode is only accessible via Windows OS; as such, if you need to configure/re-configure your IDWedgeKB and wanted to do so on Mac OS X — you will need to install a Windows Virtual Machine to do so. Please see this page for instructions on how to do that.
There are at least (3) methods of getting a Macbook to first recognize and then work with serial port events (input/output), and be able to view the results of said events:
Serial Port device events via Terminal
-
- screen terminal command — https://linux.die.net/man/1/screen
- Utilizing this command as part of an AppleScript
- Ioreg terminal command — https://www.unix.com/man-page/OSX/8/ioreg/
- screen terminal command — https://linux.die.net/man/1/screen
Serial port device events via Mac Applications
-
- CoolTerm Application
- from the creator: “simple serial-port terminal application (no terminal emulation)”
- https://www.macupdate.com/app/mac/31352/coolterm (info, download, and reviews link)
- https://freeware.the-meiers.org (original creator’s site link)
- CoolTerm Application
-
- Serial Application
- from the creator: “full-featured serial terminal (emulator) for the Mac.Connect your Mac to routers, switches, firewalls, IoT devices and much more with ease.”
- https://www.decisivetactics.com/products/serial/ (info, free trial, and purchase link)
- Serial Application
Node.js with NPM
- serialport package — https://serialport.io/
This guide will focus exclusively on the first two methods listed above, with the Node.js — node package manager (NPM) — serialport method to be described in a subsequent guide.
Serial Application method to be expanded/added at a later date**
Please note —
This guide assumes that the IDWedgeKB is configured to be connected via serial port mode. However, if yours is not, as noted above — please see instructions for how to do that here
Find serial port device and confirm device recognition
It is likely that you may have trouble finding your serial port device in the same manner that you would via the Windows platform;
So, to test that the IDWedgeKB is both connected properly in Serial Port mode and that you will be able to work with the device in Serial Port mode — you have a few options —
via Terminal
To start, open up a terminal window via Finder (cmd + spacebar) — Then you have (2) options —
Option A
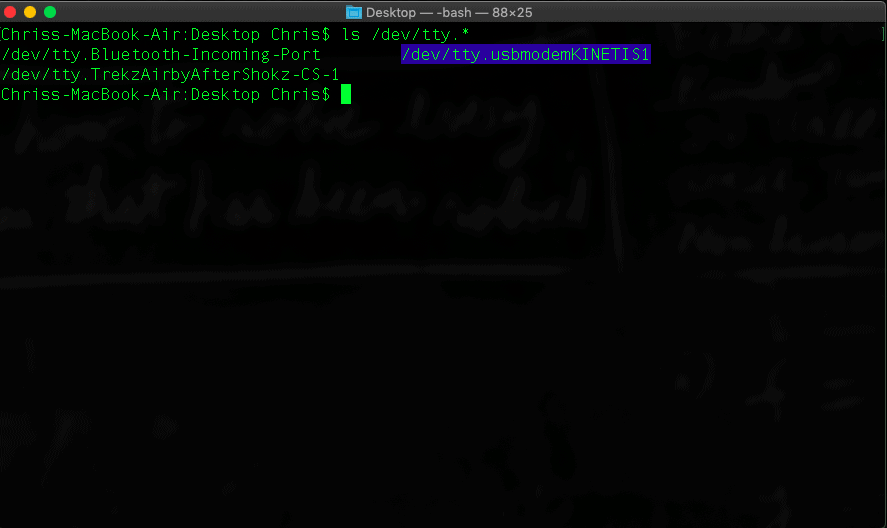
You can find (read: list via the ls command) your IDWedgeKB via Terminal with:
| ls /dev/tty.* |
Option B
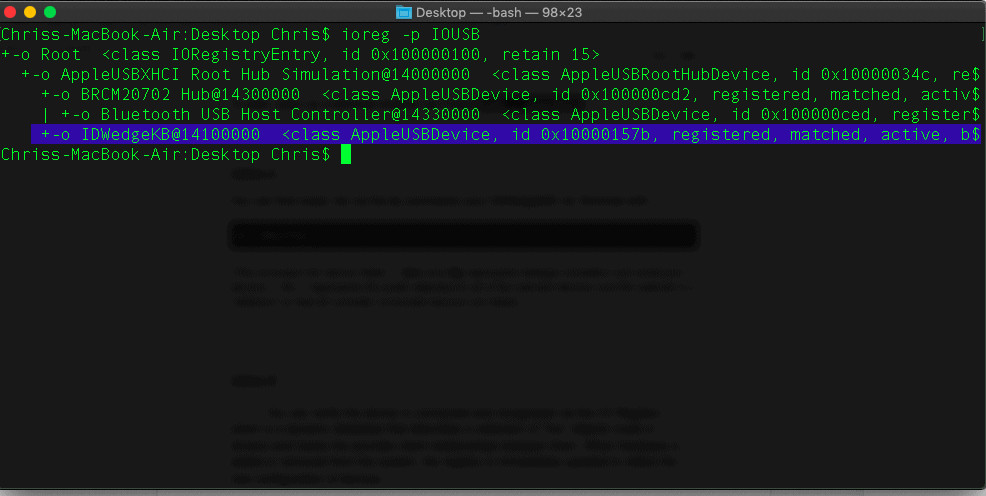
You can verify the device is connected and recognized via the I/O Registry — which is a dynamic database that describes a collection of “live” objects (nubs or drivers) and tracks the provider-client relationships between them. When hardware is added or removed from the system, the registry is immediately updated to reflect the new configuration of devices.
| ioreg -p IOUSB |
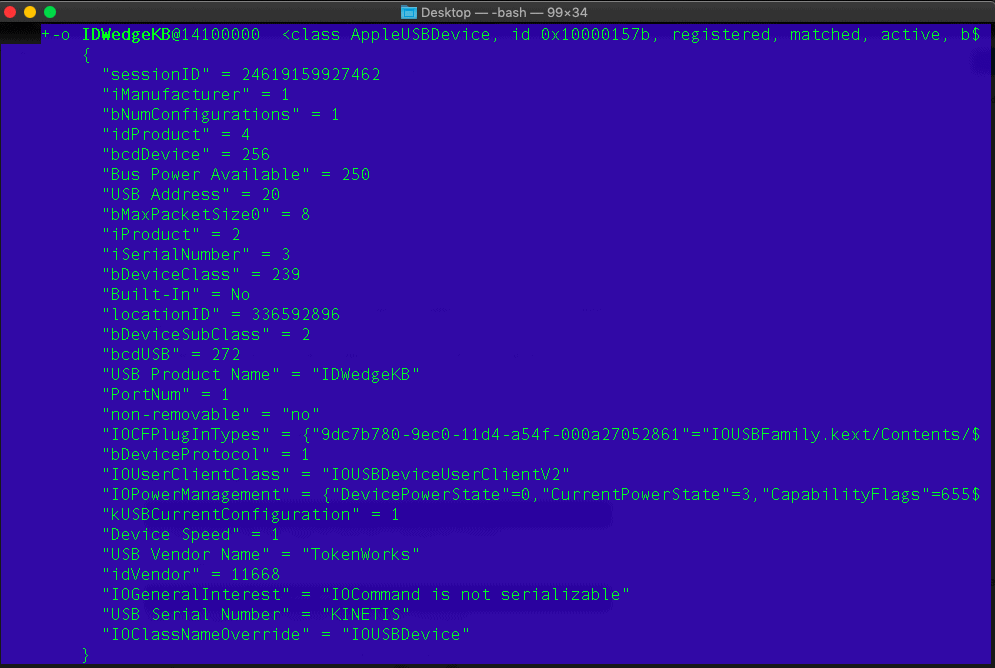
| ioreg -p IOUSB -l -b |
After taking either/both of the above steps and confirming device recognition, it is time to actually start working with your IDWedgeKB — see below
Receiving Serial Port Input Data
As per Stack Exchange:
Is there an OS X terminal program that can access serial ports?
“You can use the terminal command screen to do this!!!”
Next, you can read that serial port using the screen command like this —
| screen /dev/tty.[yourSerialPortName] [yourBaudRate] |
(see above link to the man page for what this is doing/how it works)
For Example:
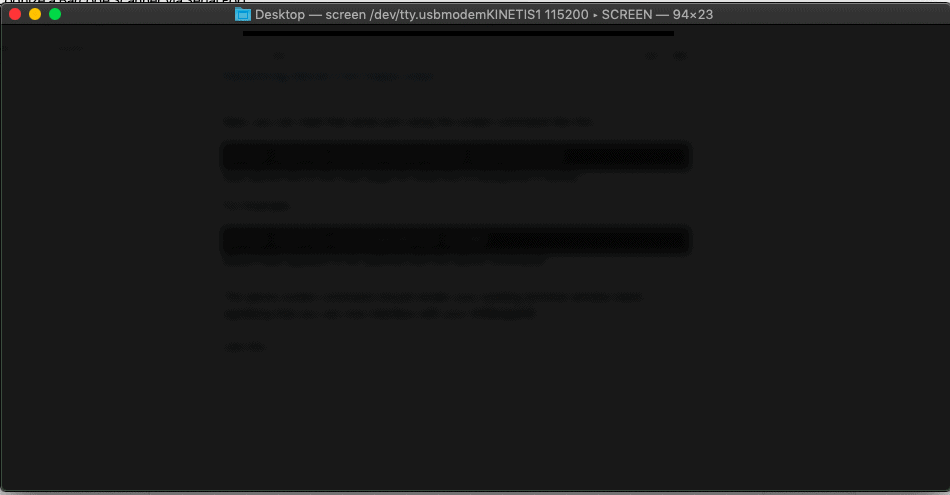
| screen /dev/tty.usbmodemKINETIS1 115200 |
(Baud Rate appears to be optional with the above command)
NOTE:
The above screen command should render your existing terminal window blank, signifying that you can now interface with your IDWedgeKB.
This behavior is expected.
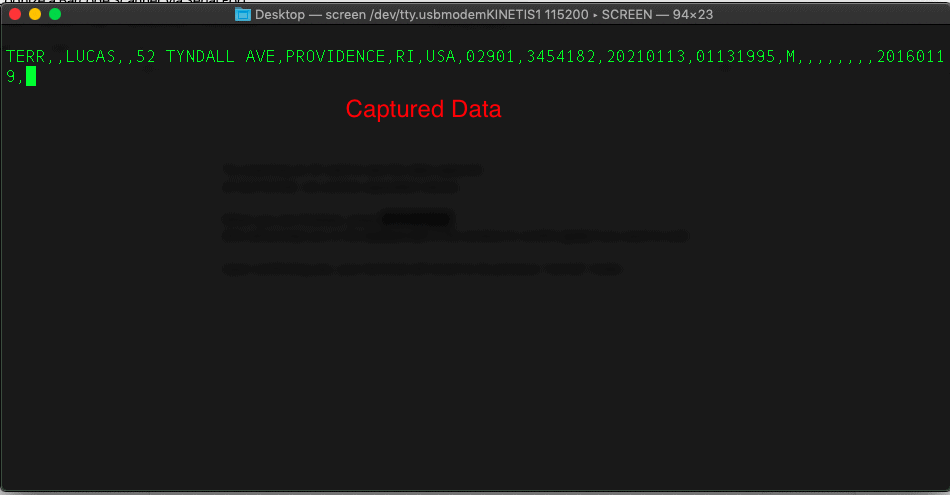
Like this —
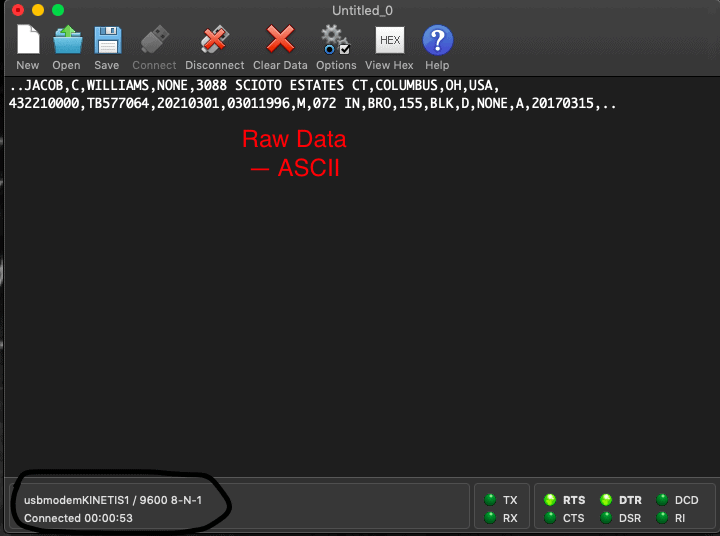
Try scanning an ID card to see the data captured similarly to the below screenshot —
(in text format, via comma separated values)
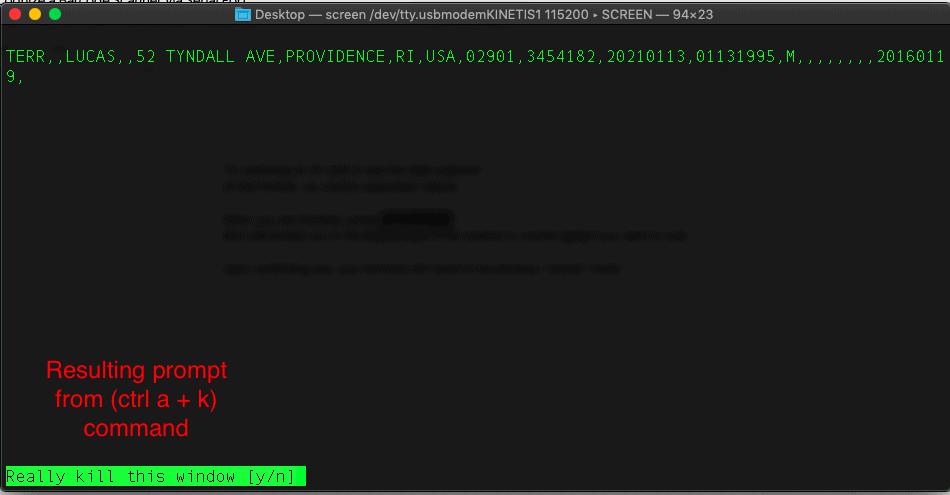
When you are finished, press ctrl a + k
Scripting
Although it is advisable to perform the above process manually at least once (ideally, twice), If you don’t want to perform the previous steps manually, and/or if you don’t want to have to subsequently manually replicate them, then you can utilize the below AppleScript as a basic template for automating at least some of this process.
As per the same Stack Exchange post as shown above:
Is there an OS X terminal program that can access serial ports?
“Or, if you prefer Mac OS X hints…
I often have to do router configuration via a console port, so I use a Keyspan Serial Adapter to get access. Two problems then present themselves: ZTerm is a horrible Mac OS X app. It hasn’t been updated in five years or so, and isn’t a Universal Binary. The developer doesn’t seem in any hurry to rectify the situation. It is not worth the shareware fee in its current form. Minicom requires installation of Fink or MacPorts and is overly complex.
Solution: Use screen, Terminal, and a little AppleScripting.
First, launch Script Editor and type/paste in the following code:
| tell application “Terminal” do script with command “screen /dev/tty.KeySerial1” set number of rows of window 1 to 100 set number of columns of window 1 to 80 set background color of window 1 to “black” set normal text color of window 1 to “green” set custom title of window 1 to “SerialOut” end tell |
Compile and save as an app from within Script Editor, and you have a double-clickable application to launch a serial Terminal session. You may want to customize this slightly — you can change the screen colors or number of columns or rows. You may also need to customize the screen command with a different device name if you are using something other than the Keyspan Serial Adapter (do an ls tty* of the /dev/ directory to get the right name).
screen uses Control-A to take commands directed to it. So type Control-A followed by Control-\ to exit your screen session. If you fail to do this and exit a Terminal session, you’ll leave the screen session alive and the serial resource unavailable until you kill the screen session manually. man screen will show you further commands to send to a screen session.”
Mac OS X — Applications
Downloading and installing
CoolTerm
Download and install the application at either of the above listed links. Once that is complete open CoolTerm and you will see the following screen —

Application Configuration
NOTE: You shouldn’t simply click Connect listed at the top of the current window.It is very possible that the device the application defaults to is not the one you want to work with.
If the above is the case, You will likely get an error message along the lines of:
“An error occurred while attempting to open the port. 100: Access Denied”
Instead —
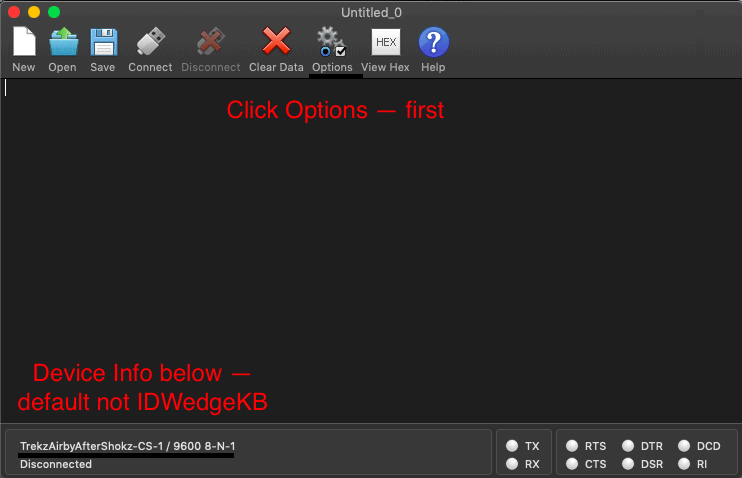
If the device information does not match the IDWedgeKB (you may see ‘Bluetooth-Incoming-Port’ and/or various wirelessly connected devices) then you may receive an error, or at least not get your desired result. Navigate to the Options pane, at the top of the CoolTerm application window, to perform some configuration steps as you see below —
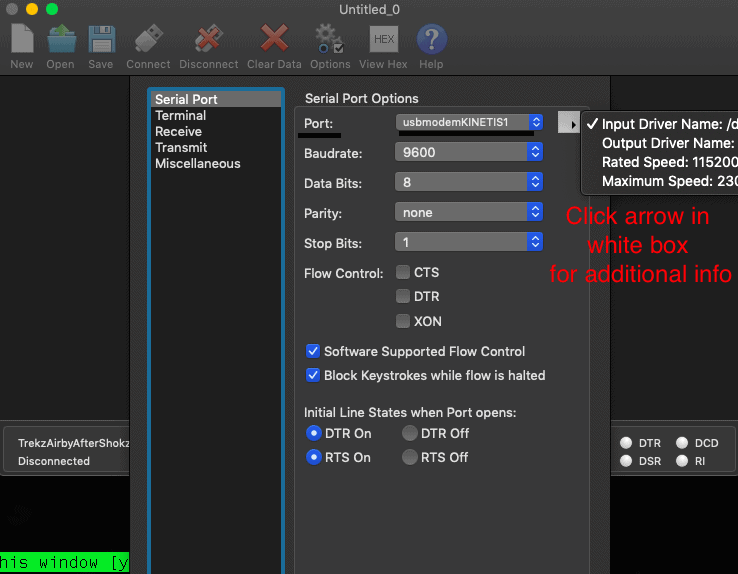
Here there are numerous options you can configure (e.g. BaudRate, Data Bits) as well.
There is also a sidebar with the following additional options sections:
- Terminal
- Receive
- Transmit
- Miscellaneous
Once you’re satisfied with the configuration options you’ve selected press OK
Finally, back in the original application window it’s time to press Connect
You should see your device listed in the bottom left with the word Connected — along with a running timer of how long the connection has been open/established
Try scanning an ID card to see the data captured in either ASCII format or hexadecimal format —
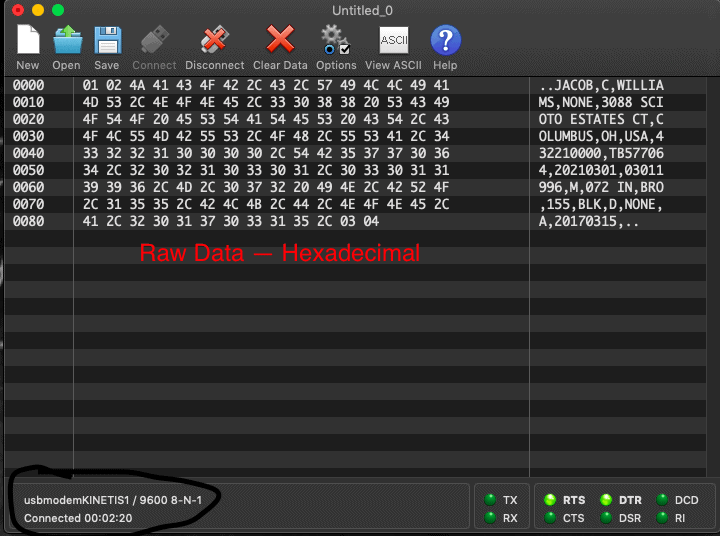
NOTE: There are options in the Receive section of the Options pane as well as listed at the top of the main application window — to capture the data in hexadecimal format and toggle between hexadecimal and ASCII
When finished simply click the Disconnect button beside the Connect button and you will see the device connection timer disappear and the word Disconnected (both in the bottom-left)
Serial
From this Stack Exchange post:
“There’s a new Mac app called Serial, available in the app store. Full disclosure- I wrote it. The main advantage over other apps is it can work with most USB to serial devices without having to install any drivers, as it has its own drivers built-in. It also does full terminal emulation so you can use it to work with Linux or other devices that require it. You can try it for free, too.”
To be expanded at a later date*
———————
END OF GUIDE
Further Reading —
I/O Registry Kit and interpreting the results of the ioreg command:
How to find the serial port number on Mac OS X?
https://stackoverflow.com/questions/12254378/how-to-find-the-serial-port-number-on-mac-os-x#12260359
The above linked-to post features a more involved/advanced version of the ioreg command —
| ioreg -p IOUSB -l -b | grep -E “@|PortNum|USB Serial Number” |